This is a superb spooky haunted castle that is great to use as your party backdrop and also makes an awesome party photo opportunity. It is large enough that guests can be photographed behind the windows or doorway if they so choose. (The castle will be about 6 feet tall by 6.5 feet long (2.4m tall by 1.8m long) although you could make this slightly higher and longer if you do not overlap the cardboard.)
We created this haunted castle as a focal decoration for our horror castle murder mystery game but the design could also be used for other horror or Halloween parties. A similar design would also serve as a medieval castle party prop.
1 Finished Haunted Castle Party Decoration and Disclaimer
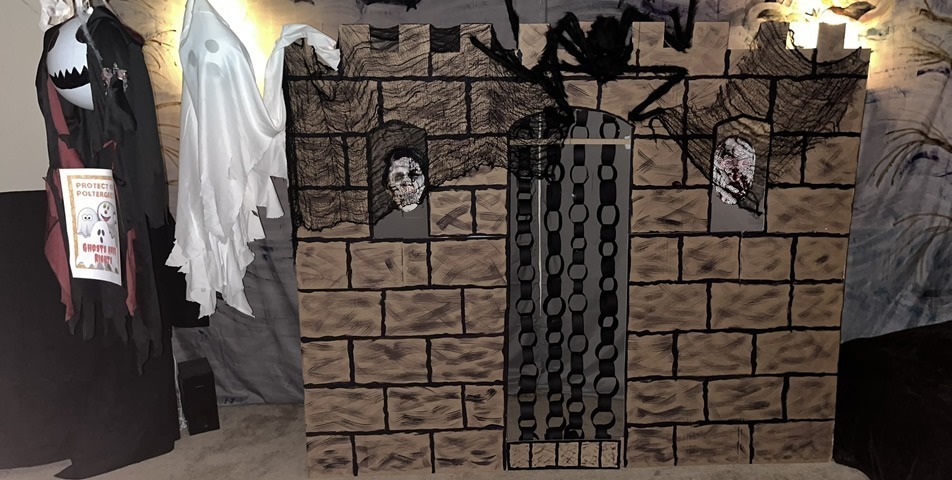
This is a large haunted castle that we created for our Horror Murder Mystery Party - it was the focal point of the evening and also served for group photos.
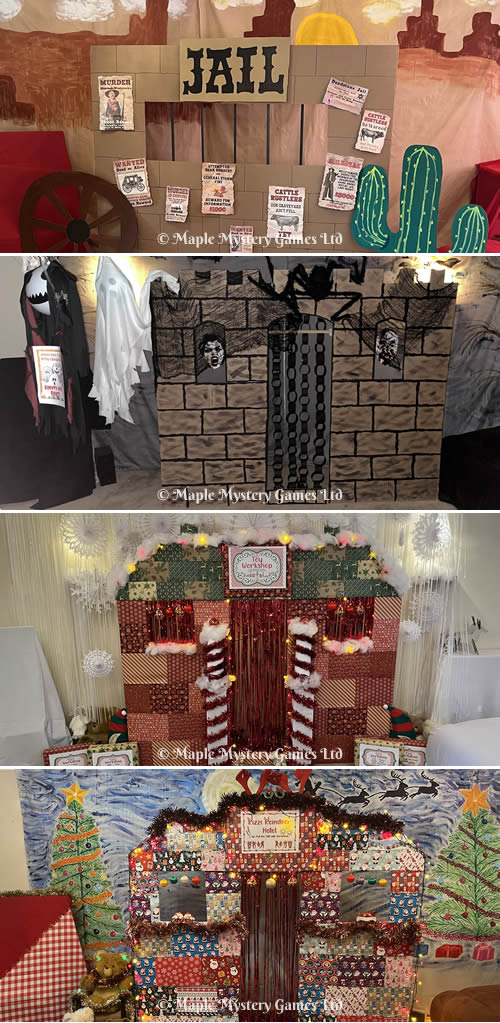
Much of the design of this castle is similar to our wild west jail party decoration , our toy workshop and also to our Christmas hotel party decoration. For lovers of our murder mystery games, or of party decorating in general, you could easily reuse much of this castle by altering the windows, door, and roofline.
As we ran our Wild West murder mystery before our Horror Castle mystery game, I chose to reuse the cardboard rather than buying new cardboard. If you look very closely, you can see places where I took cardboard from the door and added it around the windows. (The old Wild West jail had a single long window but no door and no turrets.)
I later reused this same castle to become the basis of our "Is Santa Slayed?" and also our "Murder at the Christmas Party" decorations.
A similar design could serve as a medieval castle party decor.
Top photo = Wild West Jail
Second photo = Haunted Castle
Third photo = Santa’s Toy Workshop
Bottom photo = Christmas hotel
These instructions are written to enable you to create this haunted castle without first creating the jail.
2 What You Will Need to Make Your Large Haunted Castle
Materials for the main castle:
Cardboard: 4 double-wall cardboard sheets 1000 - 1200mm thick. This extra-thick cardboard helps to give the castle wall stability.
2x4 plywood for frame: 4 strips. Together, these should be slightly less than the height and width you wish your castle to be.
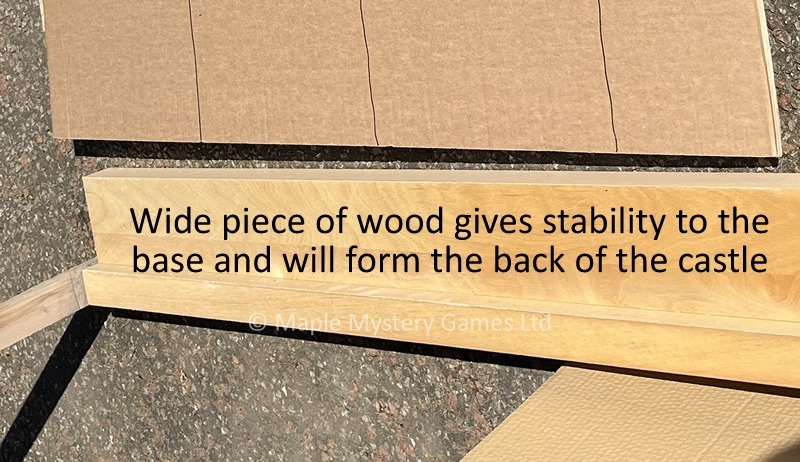
Wood for base - a piece of wood approximately 6 inches wide to run the length of your frame to give the frame stability. We used the base of an old bed frame.
Poles or strips of wood to be placed behind the castle to connect the top and the base in order to lend stability to the structure. I recommend 6 poles or strips of wood to be placed on either side of both windows and either side of the door but you might be able to use fewer, possibly just two either side of the door. (I used poles from an old gazebo that a neighbor kindly donated.)
Acrylic paint for decorating. (I used browns, purples and black.)
Black card or paper for portcullis chains.
Optional Decorations to Turn a Castle into a Haunted Castle:
Ghostly decorations of choice. I cut out spooky faces from an image library to hang in the windows and also used creepy cloth and a giant spider as well as ghosts hanging from the ceiling. Alternatives might include skeletons, skulls, hanging skeleton costumes, ghosts, gravestones, blood bags and fake blood, dolls made into mummies etc.
Optional painted backdrop. You will need two flat grey sheets (double or king size depending on the height of your wall) and acrylic paint.
Tools
Stanley knife for cutting cardboard.
Saw for cutting the plywood.
Drill for drilling holes in the base and top.
Nails or screws to hold the frame together.
Hack saw for cutting the vertical poles to size.
Staple gun for stapling the cardboard to the wooden frame.
Needle and thread for tying the cardboard to the supporting poles or strips of wood.
Pencil and tape measure or ruler for drawing the bricks.
Small or medium-sized paint brushes.
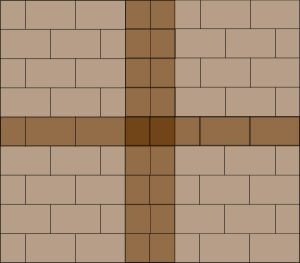
3 Draw the Bricks on the Cardboard
The four sheets of cardboard will be arranged landscape-fashion so that the longer 1200mm edges are at the bottom and top:
It is important to sketch in the bricks before cutting out the doors and windows as it is easier to check that the vertical and horizontal brick lines are all aligned. Decide how many bricks you want per sheet. I chose:
Five rows of bricks per 1000 - 1200mm cardboard sheet. Each row was 200mm high. (1000mm divided by 5.)
3 and a half columns of bricks per cardboard sheet. Each brick was therefore approximately 342.9mm wide. (1200mm divided by 3.5). The HALF brick was important as this enabled me to create a visual continuity between the two different sheets of cardboard once placed side-by-side.
Important: also decide in advance whether or not you wish to overlap the sheets of cardboard and adjust your brick design accordingly. I chose to overlap by one brick horizontally and vertically. I covered up the mismatch of bricks above the door by drawing in angled bricks in an arch. If you make a mistake, strategically placed creepy cloth or ghostly decor can disguise your error.
Using a pencil and tape measure, draw in lines of the bricks. Draw each line in pencil initially so that you can correct mistakes (if any). As you will be painting the castle later, small imperfections are not important so long as the lines and columns are true.
Tip: to create a row of bricks, use a tape measure to measure from the top at different points along each row and then use a straight edge to connect the dots. So, for the first row, draw dots 200mm down from the top and then connect these dots to ensure that the line is straight.
Then draw in the split columns. Start every second row with a half-brick as this looks more attractive.
Tip: use a tape measure to measure one brick's worth (in our case, 342.9mm) from the left. Take three markings (top, middle and bottom row) and then connect the dots. Take care to ONLY place these vertical lines on alternate rows of bricks as shown in the illustration above. Then, measure half of one brick's worth from the left (in our case 171.5 mm) and repeat this process for the ALTERNATE rows of bricks.
4 Measure the Size of the Castle Frame
In order to measure the size of the frame, lay the sheets on the ground as you wish them to be. I overlapped the cardboard sheets by one full brick vertically and a half brick horizontally. I did this partially to fit the castle into our lounge while still allowing the painted backdrop to be visible. I chose to overlap rather than cut the cardboard to add stability to the structure. Overlapping by a full brick vertically made the finished design more pleasing.
Note about overlapping by half a brick horizontally: there were only two rows of bricks above the door. By making the second row into angled bricks above the door and the top row into the turrets, this disguised the extra half-brick caused by the overlapping.
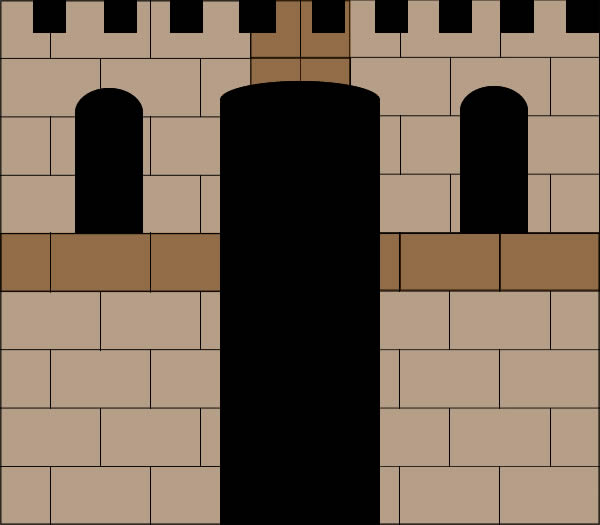
5 Cut Out the Turrets, Windows and Door
Mark in pencil where you want the windows and door to be. I created a central door and two small windows to the side. To give the appearance of a medieval castle, I made the windows slightly pointed at the top and gave the door a rounded top.
Cut out the windows and door using a Stanley knife, ensuring that your furniture is protected. (I put a piece of plywood underneath the cardboard I was cutting.)
At this point, the cardboard sheets are not attached to the frame.
6 Make the Frame of the Castle
John made the castle frame by using wood that we had in our garage. The vertical poles were given to us by a neighbor. (They had been part of a gazebo he no longer wanted.)
To give the castle stability, use a wide piece of wood for the base. This will go behind the castle wall and so is not visible. (We used a piece of an old bed frame that was approximately 6 inches wide.)
Screw 2x4 pieces of wood on top of this wide base to make the sides and top of the frame.
Castle frame is made out of wood; wide piece of wood at the bottom is placed behind the castle front to lend stability
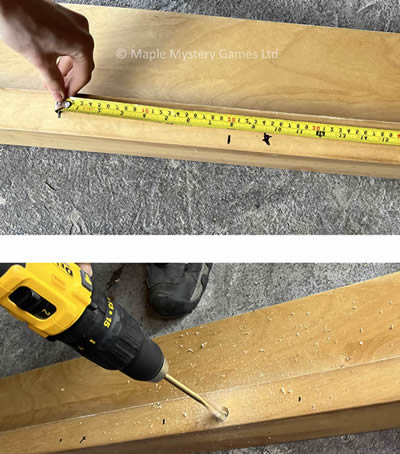
7 Add the Vertical Poles or Strips of Wood for Additional Stability
Unlike a wild west jail, these poles do NOT need to be evenly spaced as they will NOT be seen. If you do not have poles, then use 2x4 plywood strips.
I used 6 poles so that I had a pole on either side of the door and on either side of both windows. You might wish just to use poles on either side of the door.
Place poles so that they are a few inches away from the door and window so that they are not immediately seen. (The cardboard will be tied to these poles.)
Use a tape measure and a felt tip pen to mark where the poles should go on BOTH the base and the top of the frame.
Important: these measurements MUST be accurate so that the poles will go through the top slot and then into the bottom one.
Drill holes in both the top and the base. The top hole must go completely through the wood so the pole can pass through. It is best if the bottom hole only penetrates part through the wood so that it is easier to transport the structure without the poles falling out.
Measuring where vertical poles will go and then drilling holes. Note that the top and bottom measurements must match exactly.
Thread the vertical poles through the top hole and into the hole at the bottom while the frame is OUTSIDE your home. This is because it may be difficult to find space to do so indoors. (The castle is 6 feet tall and the poles are 6 feet tall; not many rooms are over 12 feet in height!)
8 Attach Cardboard Sheets to the Castle Frame
Note: it is up to you whether you wish to paint before or after you attach the cardboard to the frame. I chose to paint afterwards and used dustsheets to protect my carpet.
Use a staple gun to attach cardboard sheets to the wooden frame.
Use a staple gun to attach overlapping cardboard sheets together.
Use a needle and thread to attach cardboard sheets to vertical poles.
Tip: Use a small offcut of cardboard at the base of the door so that the wooden frame behind it cannot be seen.
Tip: You may optionally add the name of the castle ("Horror Castle") on an additional piece of cardboard and place this above the door.
9 Paint the Cardboard
Choose your color scheme. (I used a mix of purple, brown and black paint. I chose to paint with acrylic paints.)
Tips:
It is best, if you can, to do all 4 sheets of cardboard at once so that you have color consistency. If painting at different times, try adding some of your new batch of paint to all 4 cardboard sheets so that they all visually tie together.
If painting when upright, do not put too much paint on your brush to avoid runs.
Mix until you have a color that feels right.
Use a thin-medium paintbrush to paint along the brick lines. Slightly wavy and uneven lines add to the character of the castle.
Use a medium-sized paintbrush and a thinner coat of paint to color-wash between the bricks. Do not put too much paint on your brush at once.
Note: I found this an ideal way of using left-over paint at the end of a painting session. I also mixed slightly different shading variations and scattered these across the 4 sheets of cardboard to add interest.
Optionally, add any touches of horror you choose - such as spiders crawling up the walls or skulls trapped in crevices. Even consider bloody handprints or blood-colored graffiti.
10 Add Decorations to Turn a Simple Castle into a Haunted Castle
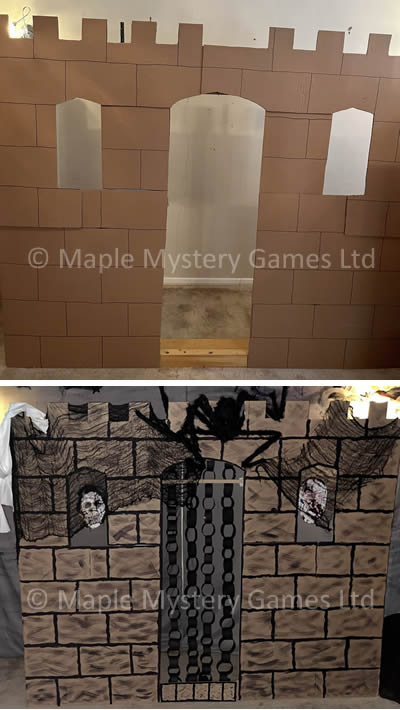
Haunted castle before and after decorations. Note that the pole that is visible between the turrets (top photo) was cut with a hacksaw.
Let your imagination run wild here. This is the step where you turn painted cardboard into something spooky and creepy.
My haunted decorations:
I created a painted backdrop of a night scene with skeletal trees, flying bats, and moonlight. I did this by painting two king-size flat grey sheets with acrylic paint and then attaching these sheets to the picture rails with pins. I found that this extended the visual of my haunted castle and made it far more of a focal point.
I added a chain portcullis to the door. These chains were easy to create.
I cut black cardboard into strips about 8 inches by 1.5 inches. Choose a size that is right for you and stick with a size that is approximately the same for all chains.
To create a chain, tape or glue the two short edges of a piece of card together. Then thread the next piece of card through the loop and tape or glue the two short edges of that card together. Repeat until you have the desired length. Note that the height of the chain should be the drop from the top wooden frame to the floor.
Hang these chains from the top wooden frame inside the door.
I made a mistake when cutting out the turrets. I therefore stapled in an extra turret and covered the join with a giant spider.
I added in creepy cloth.
As an extra spooky touch, I downloaded creepy faces from an image library I subscribe to and pasted these on spooky masks. I hung these in the windows with cotton thread to make it appear that there were disembodied faces at the windows.
I then suspended "ghosts" from the ceiling to the side of the castle using several strands of white cotton. These ghosts were balloons with creepy faces drawn on. One was covered with a tattered sheet; the other was covered with the tattered remains of a dressing-up costume my children had had when they were younger. Note that cutting tatters into the sheets and the costume made them look more ghost-like. On a practical level, it also reduced the weight of material that needed to be suspended from the ceiling.
I covered nearby furniture with flat black sheets to avoid the modern world intruding on this spooky setting.
Other ideas you might try to turn a cardboard castle into a haunted one:
Add bloody handprints and chilling words such as "abandon hope" or "enter if you dare" in red paint. These might work well as a cardboard sign above the door.
Add "blood bags" to the wall and windows. (Blood bags are available from sites such as Amazon as party drinks containers.) Optionally fill these bags with water colored with red food coloring or red paint. Ensure the cap is screwed on tightly and that it is leak-proof and secure. Important disclaimer: this is optional and at your own risk; you need to take all necessary steps to protect carpets and furnishings.
Note: if you fill with fruit juice, the fruit juice will ferment and the gasses will inflate the bag; at some point, this could then "explode" with unpleasant consequences for carpets and furnishings. I would strongly suggest you do NOT do this.
Have a life-size skeleton sitting in front of the castle; optionally add tattered clothing and a chilling sign such as "Be Like Me and Enter".
Have a skeleton half-in and half-out of the door.
Have a mini skeleton trying to climb out of one of the windows.
Have a row of skulls in front of the door.
Make the skeleton and skulls appear extra spooky by putting small LED balloon lights inside pieces of green or orange tissue paper and then placing or taping this into the eye sockets.
Add Halloween sweets such as gummy worms or snakes to the walls and windows.
Tape colored tissue paper behind the windows. (Green or purple paper will work well.) Cut a ghostly or other spooky shape out of black paper and then suspend this from the top frame or attach to the tissue paper so that it appears that the ghost is behind the window. Add lighting behind this tissue paper to give an eerie glow.
Create a graveyard outside the castle by making cardboard gravestones.
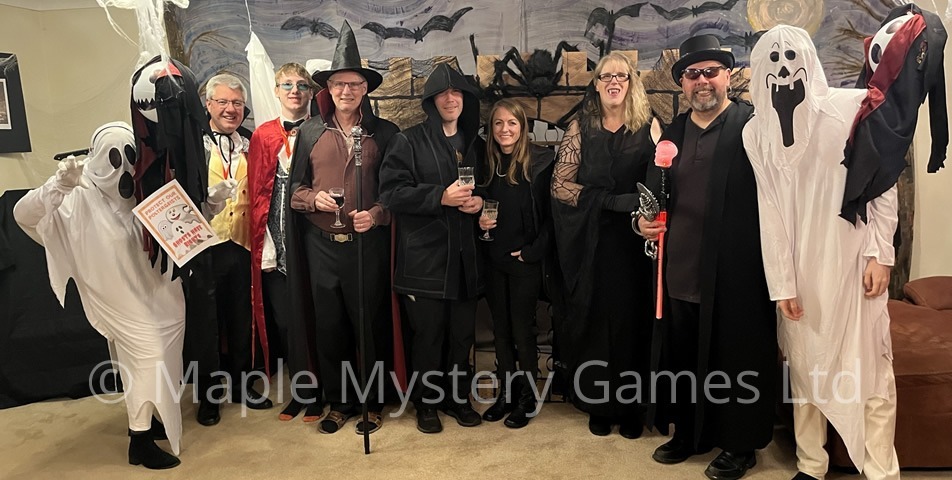
11 Haunted Castle in Our Horror Murder Mystery Party
This haunted castle made a spooky backdrop to our horror mystery party - especially when the guests first entered with the lights turned down low and with the room lighting coming from the wall lights behind the spooky sheet paintings:
This is a large haunted castle that we created for our Horror Murder Mystery Party - it was the focal point of the evening and also served for group photos.
The castle made a great backdrop for our group party photo. If we hadn't put masks in front of the windows, guests could have had fun posing behind them.
Our guests pose in front of the haunted castle at the start of our horror murder mystery party
These ideas are provided for your inspiration only. Any recipes or recipe ideas should be tested before your party. Ideas for party recipes, decorations or costumes should be adapted as you wish. It is YOUR responsibility to follow any necessary safety precautions.
We use cookies to ensure you get the best experience and to analyse our traffic: see Cookie Policy